





BIM Coordination Process: Practical Guide to MEP Coordination and Project Efficiency
Learn the BIM coordination process step by step, from planning and federation to MEP checks and handover, with an owner for every step.


Key takeaways
The Building Information Modeling (BIM) coordination process is a repeating loop in which each cycle tests the current federated model and gives every clash one owner.
BIM coordination usually breaks at the handoffs after detection, when an issue has no owner or a trade keeps modeling against a superseded version.
Mechanical, electrical, and plumbing (MEP) coordination needs site-experienced input early, since a route that clears in the model can still block installation.
Every step needs a done-condition, so the team knows when a zone is coordinated and ready for fabrication drawings and formal sign-off.
CUBE keeps the loop closed: Merged Files flag new discipline versions, and staged Review Flows route each coordinated zone to sign-off.
A BIM coordination process checks each discipline's model against the others before construction. This way, teams resolve conflicts through model edits. MEP zones gain the most, since several trades share the same ceiling space. Each model fix protects the schedule and budget.
When the process slips, those savings disappear on site. A sprinkler main and cable tray meet above a corridor ceiling, and the clash gets lost between model updates. Both trades unknowingly build shop drawings based on their versions, creating further on-site issues.
The repair here is to document ownership. At the end, every clash should leave the meeting with one owner and a done condition. This guide applies that repair to each step, beginning from planning to handover. It then covers the MEP checks models miss, plus a launch checklist.
How Does a BIM Coordination Process Improve Project Efficiency?
A defined BIM coordination process moves conflict resolution from the site to the model, where a fix costs a model edit. Fewer clashes reach the field, so rework
and coordination-related RFIs drop. The savings only show up if you set targets before coordination starts and measure each cycle against them.
Pick goals your project team can count each cycle:
Zones signed off: coordinated zones approved before their fabrication deadline.
Clashes resolved per cycle: tracked by zone and discipline.
Coordination-related RFIs: field requests for information (RFIs) traced back to an unresolved coordination issue.
Rework hours: logged against zones that were already marked coordinated.
Tie each goal to a cost or schedule target the project executive already tracks. Signed-off zones protect the fabrication schedule. Fewer coordination-related RFIs and rework hours protect the budget.
Set Up Three Foundations Before Your First Federation
Three Foundations Before You Federate
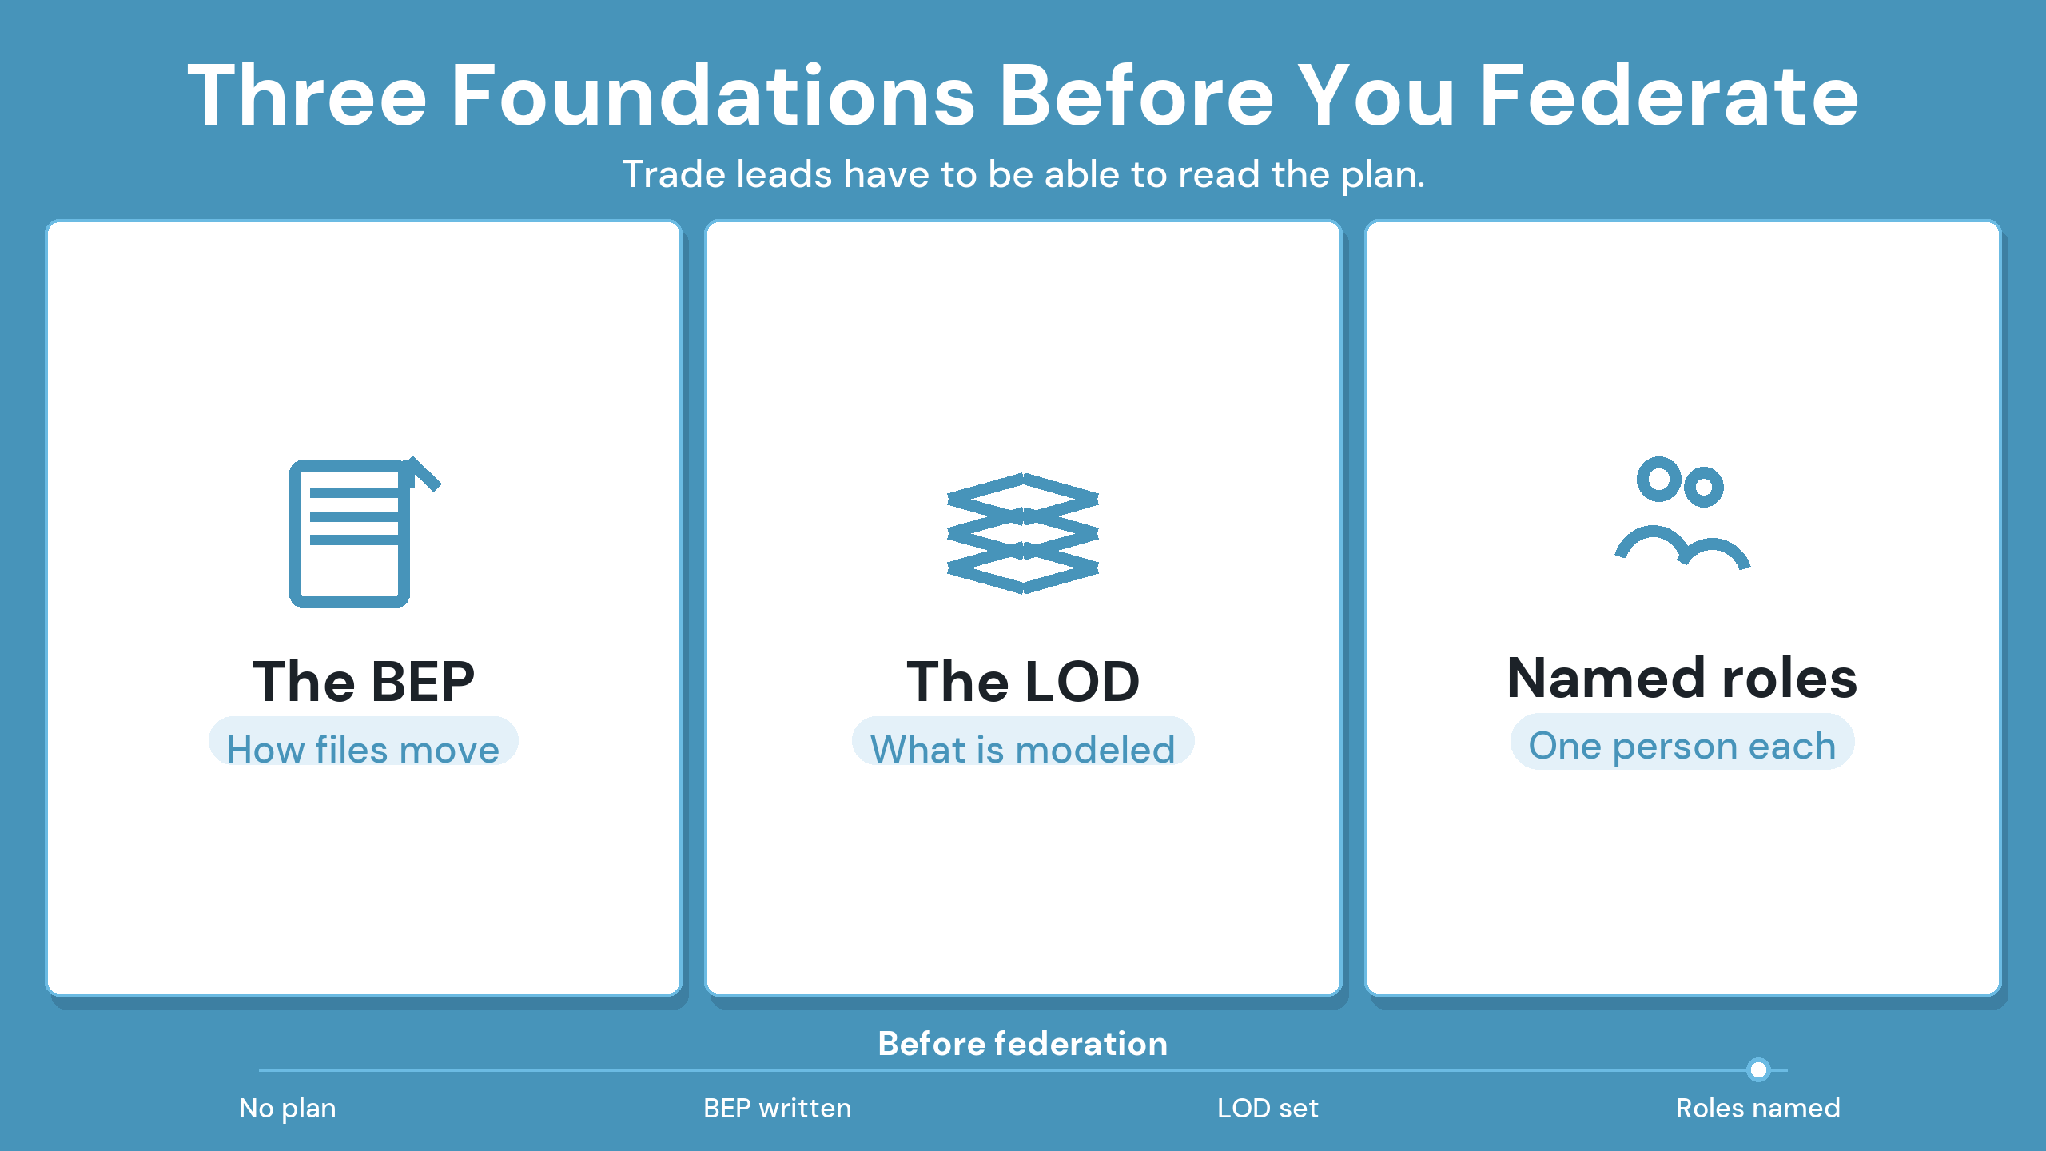
Three things need agreement before the first model is federated, and each has its own step below. Skipping any of them turns coordination meetings into arguments about scope.
1. Write a concise BIM Execution Plan
The BIM Execution Plan (BEP) records how models are produced and exchanged. Keep it short enough that trade leads actually read it, and cover these points at minimum:
File formats and how often each trade uploads.
The coordination cycle and meeting day.
The naming convention for files and folders.
The sign-off route for each zone.
2. Set the Level of Development for each deliverable
Level of Development (LOD) defines how complete a model element must be at each phase. Set it per discipline and per deliverable. An MEP model at too low an
LOD produces clashes that disappear once real equipment sizes arrive, which wastes whole cycles.
3. Assign clear roles and responsibilities
Name one person for each role in the BEP:
BIM manager: owns the BEP and the coordination schedule.
Virtual Design and Construction (VDC) lead: federates models and runs clash tests, then chairs the coordination meeting.
Trade modelers: fix issues assigned to their discipline and upload updated models.
Design team: approves any fix that changes design intent.
Owner's representative: signs off zones where operations or maintenance access is affected.
Run the BIM Coordination Process in Seven Steps
Seven Steps, Each With a Done Point
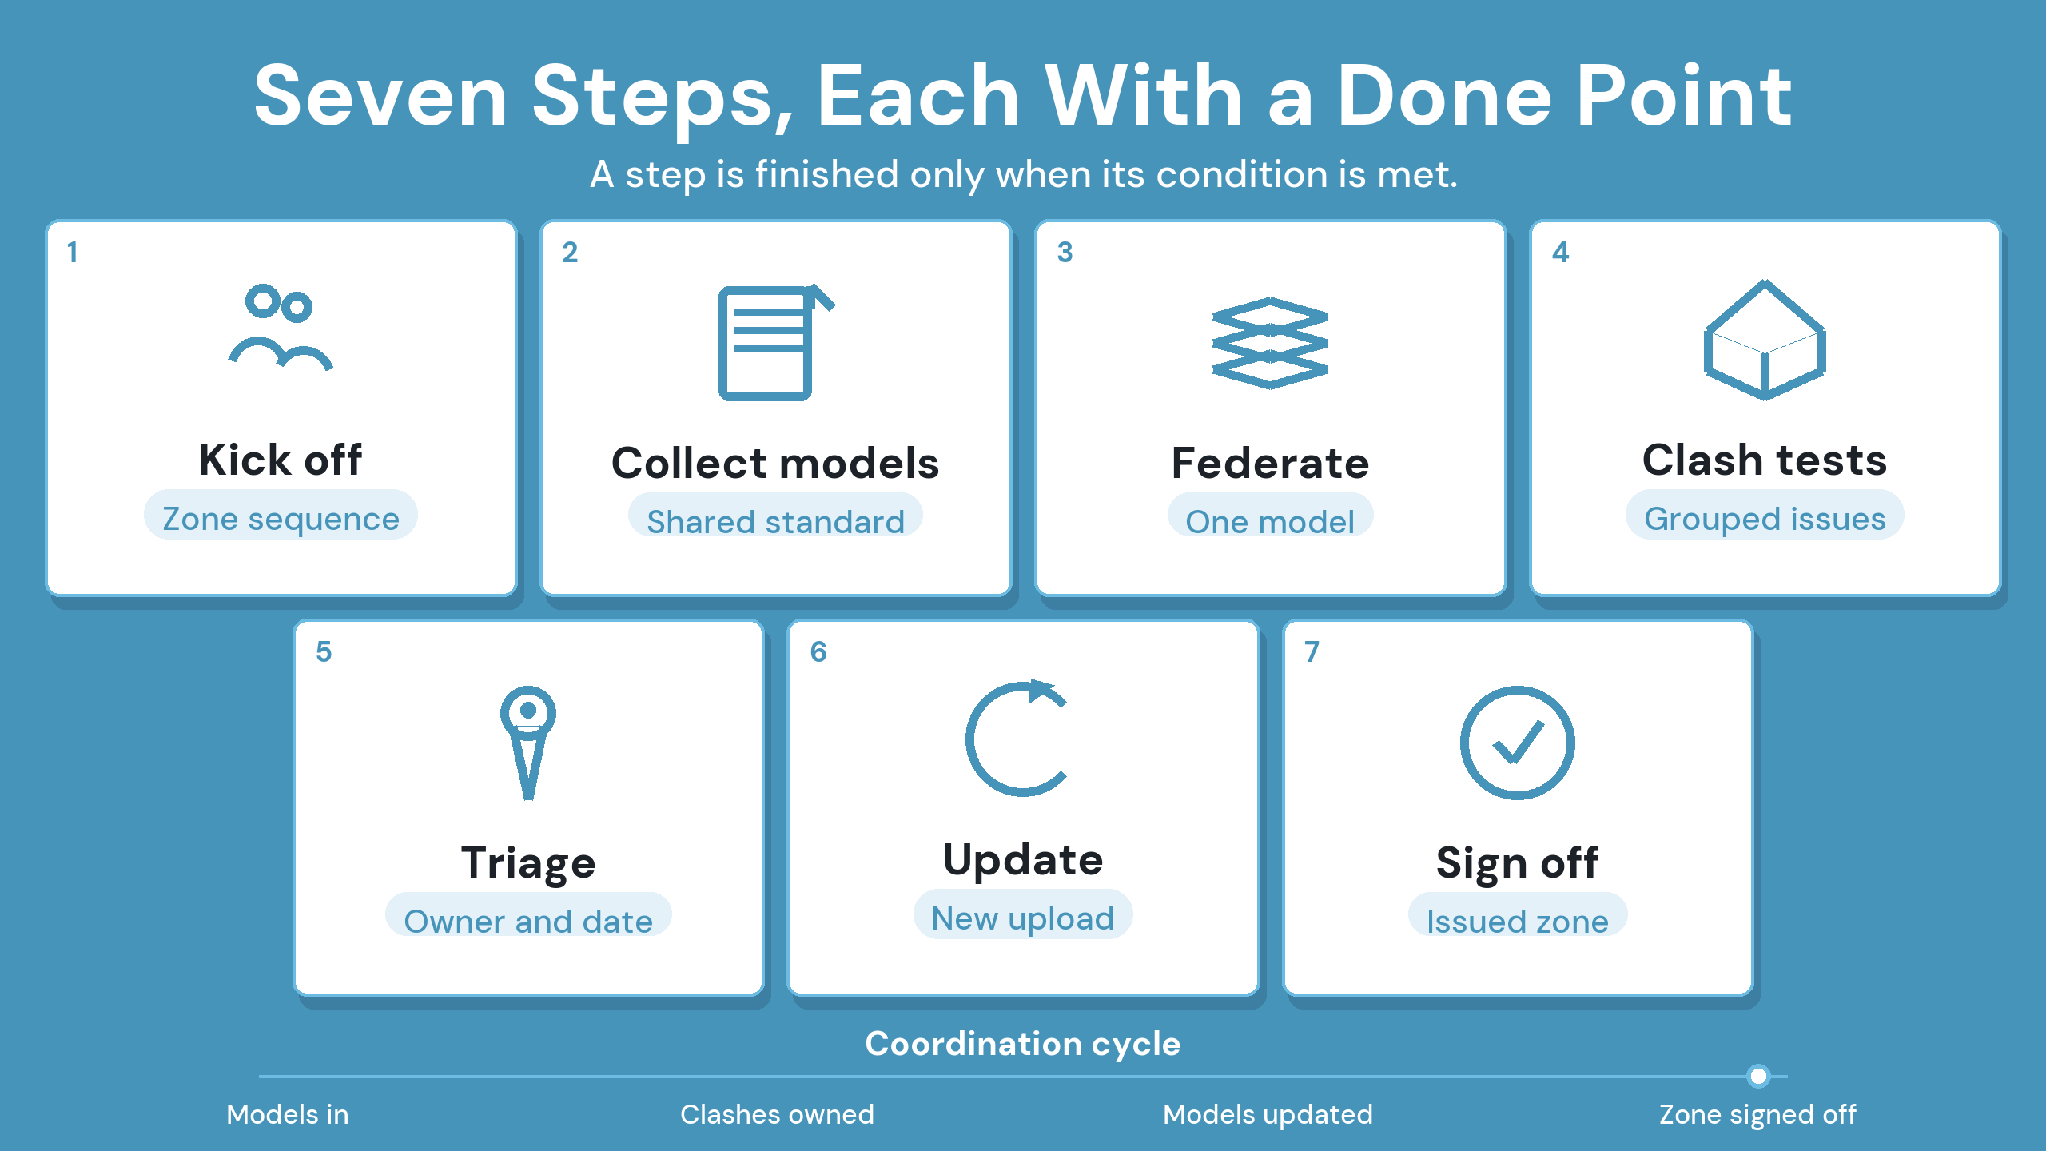
The process runs as seven steps, and steps three to six repeat every cycle until a zone is signed off. Each step below names its owner and the condition that marks it done.
1. Kick off with stakeholders and define scope
Agree which zones coordinate first, usually the densest MEP areas such as plant rooms and corridors. Confirm meeting cadence and who attends.
Owner: BIM manager.
Done when: every trade lead has confirmed the zone sequence and the first upload date.
2. Collect discipline models on agreed file standards
Each trade uploads its model in the format and naming the BEP specifies. Check a sample from every trade before the first cycle, since one misaligned origin breaks the whole federation.
Done when: every discipline model loads at the correct coordinates.
3. Federate discipline models into a single 3D model
Combine the discipline models into one coordination model. The risk at this step is a federation that silently falls behind its sources.
In CUBE, a Merged File combines discipline models into one file with its own version history. When any discipline uploads a new version, CUBE automatically creates a new version of the merged file, so the federation stays current.
Done when: the federated model reflects the latest version of every discipline model.
4. Run clash detection and capture issues
Run the same saved clash tests each cycle so results stay comparable. CUBE's Clash Tests, a paid add-on, run on merged models and separate new clashes from resolved ones on each re-run.
Done when: clash results are grouped and ready for the meeting.
5. Triage clashes in the coordination meeting
The meeting exists to assign work. A fixed agenda keeps it to that:
Review open items from the last cycle, starting with overdue ones.
Walk new clash groups in priority order, zone by zone.
Assign each group to one owner with a due date before moving on.
Record every decision and workaround in the shared issue log.
Ownership and the exit condition for this step:
Owner: VDC lead, with trade leads who can agree reroutes on the spot.
Done when: every new clash group has an owner and a due date.
6. Resolve issues and update models
Trade modelers fix assigned issues in their authoring tools and upload new versions. Issues raised in CUBE carry the IDs of the model elements they reference, so a modeler finds the exact object without searching.
Owner: trade modelers.
Done when: updated models are uploaded before the next cycle's federation.
7. Approve the coordinated zone and prepare handover
The latest version of a model can still be unapproved for fabrication. CUBE separates the two.
Every upload creates a version automatically. A revision is a marker you apply by hand to the version you actually issued, using a revision series (A, B, C or 01, 02, 03) set for that folder. Status is separate again. An admin creates your own statuses in Portal Settings and maps them onto review levels, so "latest version" and "released for fabrication" stay distinct.
Owner: BIM manager, with design team and owner's representative sign-off.
Done when: the zone's models carry an issued revision and an approved status.
What Do MEP Teams Need Beyond Clash Tests?
MEP zones generate the most clashes, since several trades compete for the same ceiling space. Confirm real equipment sizes and check routes with a site-experienced coordinator. Then model maintenance clearances and issue layouts from the signed-off model, since those four steps catch what clash tests alone miss.
1. Confirm MEP model LOD before coordination runs
Check that duct and pipe models use actual equipment sizes before the first run. Placeholder geometry creates clashes that vanish later and hides the ones that matter.
2. Validate routing with site-experienced coordinators
A route can clear every clash test and still be impossible to install. Ask a coordinator with field experience to check hanger space and install sequence for
each dense zone.
3. Verify maintenance access and installation clearances
Model the space needed for valve access and filter changes as clearance zones, along with the swing of every panel door. Soft clash tests then flag any element that intrudes on that space.
4. Produce coordinated MEP layout drawings from the model
Once a zone is signed off, generate the trade layout drawings from the coordinated model. Issue them through CUBE's Transmittals, which record who sent what to whom, down to the exact file versions.
Decide How Often to Run Clash Tests and What to Fix First
Clash detection inside the coordination process needs four decisions, each covered below. Agree on all four in the BEP before the first run.
1. Match clash run frequency to the project phase
Run tests less often in early design, when geometry still moves week to week. Move to a weekly cycle during peak MEP coordination, when each lost week pushes a fabrication date.
2. Classify clashes by severity and installation impact
Rank every clash group before assigning it:
Critical: blocks structure or fabrication and needs a decision this cycle.
Major: requires a reroute that affects another trade.
Minor: resolvable within one discipline's model.
3. Escalate unresolved critical clashes
A critical clash still open after one cycle goes to the BIM manager. If it needs a design change, the design team decides at the next meeting.
4. Close clashes only after a model update and sign-off
Mark a clash resolved only when the updated model shows the fix and the next test confirms it. In CUBE, an admin configures clash statuses and groups them into categories, including separate positive and negative closed states.
Which Software Rules Keep Your Models Compatible?
The software stack decides how much of the BEP holds up in practice. Require IFC export and one naming convention from every trade. Then host every model in a common data environment and test two disciplines together before merging the rest.
1. Require IFC export from every authoring tool
Industry Foundation Classes (IFC) lets trades on different authoring tools share one federated model. Test each trade's IFC export on a sample model, and save the export settings that work.
2. Standardize file naming and folder structure
Agree on one naming convention and enforce it where files land. In CUBE, a nomenclature series assigned to a folder sets the segments every file name in that folder and its subfolders must follow, such as project code and discipline. Uploads that don't match go to Escrow for correction.
3. Host federated models in a common data environment
Keep discipline models and the federated model in a Common Data Environment (CDE), next to the drawings and approvals they affect. Shared drives lose the link between a model version and the decision made on it. For more, read what a common data environment is and why it matters.
4. Validate interoperability before large merges
Merge two disciplines first and check alignment and units, then spot-check element properties. Add the remaining disciplines only after the pair loads cleanly.
Put the Coordinated Model to Work in the Field
The coordinated model keeps paying off after sign-off, as long as site teams can check it. Field use comes down to three practices.
1. Give field teams access to the current model
Superintendents need to check a coordinated zone before installation starts. CUBE opens models in the browser, while its mobile app handles form-based work such as inspections, plus QR checks on printed sheets.
2. Confirm printed sheets are current
Printed drawings outlive the revisions they show. Before issuing a drawing for site use, place a CUBE QR code on the PDF from the viewer.
A crew member scans it with the CUBE mobile app and sees whether that printed sheet is the latest version or has been superseded, and can retrieve the current one. Re-insert the code on each new version, since it records the version it was added to.
3. Use overlays and 4D sequencing where the job justifies them
Some field tools overlay the model on site through augmented reality, which helps verify embeds and sleeves before a pour. Linking model elements to the schedule supports 4D sequencing reviews for congested zones.
Who Decides When a Clash Outlives Its Due Date?
The BIM manager takes any critical issue that misses a cycle. Scope or cost decisions then move to the project executive and the owner's representative. Write that escalation path into the BEP, along with approval and reporting rules, so nobody improvises them mid-project.
1. Define the escalation path for unresolved conflicts
A critical issue that misses one cycle goes to the BIM manager. If it needs a scope or cost decision, it moves to the project executive and the owner's representative.
2. Require documented approvals for major routing changes
A reroute that moves a main or changes a ceiling height needs more than a meeting note. A Review Flow in CUBE is a reusable template with up to 20 ordered levels, for example, Contractor Coordination Check, then Design Review.
Each level has its own reviewers, its own checklist, and a minimum number of reviewers who must act before it moves on. That keeps the contractor's coordination checks separate from the design reviewer's questions, in the order the project needs them.
Case in point: a global design consultant
The consultant's teams were working across siloed tools. CUBE replaced them with one centralized CDE, with integrated review workflows across teams and simplified Transmittals. Read the full case study →
3. Publish a weekly coordination report
Send one short report after each meeting so stakeholders outside the room see progress. Keep it to what changed:
Zones signed off this week and zones still open.
New and resolved clash groups by discipline, with overdue items flagged.
Decisions waiting on the design team or owner.
Measure Whether Your Coordination Is Working
Track a small set of measures every week and review them monthly with trade leads. The trend tells you more than any single week's figure.
Clashes raised versus resolved: a widening spread means the team is finding problems faster than it fixes them.
Rework hours on coordinated zones: ask foremen to log field rework against zone IDs, so you can see whether sign-off is holding.
Cycle time per zone: count the cycles each zone takes to reach sign-off, and compare zones of similar density.
Run a short review at project close. Record which BEP rules held, which ones the team bent, and what the next project should change.
Launch Your First Coordinated MEP Project With This Checklist
Use this checklist on the first project where you run the full process:
Pick one representative project with dense MEP zones for the pilot.
Train every model author on the BEP standards and file naming.
Book the recurring coordination meeting and the clash run before it.
Publish templates for the meeting agenda and the weekly report, plus a shared issue log.
Agree the sign-off route for coordinated zones with the design team.
Set a date for the post-project review before the pilot starts.
Run a BIM Coordination Process That Holds Up With CUBE
What Keeps the Loop Current
A BIM coordination process holds up when every step has an owner and a done condition. It also depends on a federated model that stays current between cycles. Start with one pilot project, then turn what worked into company standards.
CUBE supports the steps that usually slip. Merged Files re-version automatically when a discipline model changes, and Review Flows route each coordinated zone to sign-off in the order your project needs.
Ready to run the coordination loop on a real project? Sign up for CUBE and try federation, clash tests, and approvals with your own models.
Frequently Asked Questions
1. When should MEP coordination start on a project?
Start once architectural and structural models are stable enough to route around, usually during design development. Starting later turns model fixes into field changes, while starting too early spends coordination cycles chasing geometry that keeps moving.
2. Can a specialty subcontractor run its own coordination process?
Yes. A subcontractor can federate its trade models with the general contractor's latest files in CUBE and run Clash Tests, a paid add-on. Issues then reach the coordination meeting already logged and assigned.
3. What software does MEP coordination need?
You need authoring software and a coordination tool that federates models and runs clash tests. Issues and approvals also need a shared home, such as a common data environment, so every decision stays traceable after the meeting ends.
4. How do we scale coordination across projects?
Turn the pilot's BEP and report templates into company standards, then reuse them on the next job. In CUBE, a Review Flow is a reusable template, so the same approval stages carry across every new project you set up.
5. Who should chair the coordination meeting?
The general contractor's VDC lead or BIM coordinator usually chairs it. Trade leads attend with authority to agree on reroutes on the spot, and the design team joins whenever a proposed fix changes design intent.